Bambi
Recipes!
There is a lot of talk around the shop these days, what almost
got killed, what's gonna be killed, or what was killed. Yes kids,
we're knee deep in DEER SEASON! I'm not a hunter myself,
but I appreciate the fact that these guys are out there at the
crack of dawn waiting to draw a bead on some unsuspecting four
legged creature. Because I'll tell ya' after quick exchange of
cash, I'm slapping some venison steaks on my Brinkman Grill.
Gentlemen, start your killing.
Here are some basics for properly field dressing my next barbecue.
Also, find some great recipes below. By the way, if you look closely
at the belly of your next kill you'll find this statement,
"SURGEON GENERAL'S WARNING: Cutting open a deer and making your
kid take a bite out of the heart will result in lower IQ scores,
because your an idiot and your son will grow up to be an idiot
as well." If you want a ritualistic right of passage for
someone, call me, I'll let them do my taxes. That will show bravery.
Field Dressing
Admittedly, the field dressing chore is not the most enjoyable
part of the hunt, but the extra time spent taking care of the
meat will pay dividends at the table. Field dressing takes effort,
so your heavy hunting coat should be removed and your sleeves
rolled up so they wont be soiled. Disposable vinyl or latex gloves
lessen the chances of passing infectious diseases and make hand
cleaning easier.
Blood and digestive juices from organs possibly penetrated by
the shot must be removed from the body cavity quickly, and the
sooner the organs, which deteriorate rapidly, are removed, the
faster the meat will cool. Field dressing also eliminates dragging
unnecessary weight when moving the animal.
Before starting the field dressing process, keep in mind that
it is important to keep dirt and foreign objects away from the
exposed body cavity. Removing the scent glands is not considered
necessary, but is done with care by many hunters. Some archery
hunters save the glands for use as scent while hunting. Removing
the glands carelessly can taint the meat.
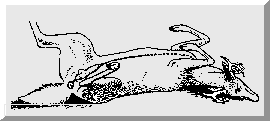 Roll
the carcass over on its back with the rump lower than the shoulders
and spread the hind legs. Make a cut along the centerline of belly
from breastbone to base of tail. First cut through the hide, then
through belly muscle. Avoid cutting into the paunch and intestines
by holding them away from the knife with the free hand while guiding
the knife with the other. Roll
the carcass over on its back with the rump lower than the shoulders
and spread the hind legs. Make a cut along the centerline of belly
from breastbone to base of tail. First cut through the hide, then
through belly muscle. Avoid cutting into the paunch and intestines
by holding them away from the knife with the free hand while guiding
the knife with the other.
Unless the head will be mounted, the cut should pass through
the sternum and extend up the neck to the chin to allow removal
of as much of the windpipe as possible. The windpipe sours rapidly
and is a leading cause of tainted meat.
With a small sharp knife, cut around the anus and draw it into
the body cavity, so lt comes free with the complete intestines.
In doing this, avoid cutting or breaking the bladder. Loosen and
roll out the stomach and intestines. Split the pelvic or "aitch"
bone to hasten cooling.
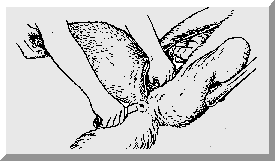 Cut
around the edge of the diaphragm which separates the chest and
stomach cavities, and split the breastbone. Then, reach forward
to cut the windpipe and gullet ahead of the lungs. This should
allow you to pull the lungs and heart from the chest cavity. Drain
excess blood from the body cavity by turning the body belly down
or hanging animal head down. Prop the body cavity open with a
stick to allow better air circulation and faster cooling. Cut
around the edge of the diaphragm which separates the chest and
stomach cavities, and split the breastbone. Then, reach forward
to cut the windpipe and gullet ahead of the lungs. This should
allow you to pull the lungs and heart from the chest cavity. Drain
excess blood from the body cavity by turning the body belly down
or hanging animal head down. Prop the body cavity open with a
stick to allow better air circulation and faster cooling.
A clean cloth may be useful to clean your hands. If you puncture
the entrails with a bullet or your knife, wipe the body cavity
as clean as possible or flush with water and dry with a cloth.
Don't use water to wash out the body cavity unless the paunch
or intestines are badly shot up. Part of the satisfaction of the
hunt comes with making a clean kill and in doing a neat job of
field dressing your animal. Veteran hunters may have variations
in the steps of field dressing. The important points are to remove
the internal organs immediately after the kill without contaminating
the body cavity with dirt, hair, or contents of the digestive
tract and to drain all excess blood from the body cavity.
All parts damaged by gunshot should be trimmed away. If the weather
is warm of if the animal is to be left in the field for a day
or more, it may be skinned, except for the head, and washed clean
of dirt and hair. It should be placed in a shroud sack or wrapped
with porous cloth to cool (cheesecloth is ideal). The cloth covering
should be porous enough to allow air circulation but firmly woven
enough to give good protection from insects and dirt. Lacking
porous cloth, hunters often coat the inside of the body cavity
with black pepper to repel insects. Adequate cooling may take
six hours or more, depending on weather conditions.
The Trip Home
After the deer or antelope is checked and sealed, the head may
be removed and the animal quartered for easy handling. A car top
carrier is ideal to transport the kill home, or you may prefer
to put it in the trunk. However, don't park in the sun or in a
heated garage. Never tie the deer or antelope to the car where
engine heat can cause deterioration. Warm meat spoils quickly.
Aging The Meat
Age the carcass in a cool, dry place. Aging of well cared for
carcasses at correct temperatures yields better flavored, more
tender meat. Best results are obtained in a near constant temperature,
preferably from 34 to 36 degrees Fahrenheit. Aging for one to
two weeks is about right for the best quality venison, depending
on the age and condition of the animal.
Cutting The Carcass
If the carcass is to be placed in freezer or locker plant storage,
it may be more convenient to use the services of an experienced
butcher for the cutting and wrapping. If the intent is to gain
experience by doing the job yourself, cut according to the diagram shown.

The first step is to saw the carcass down the center of the backbone,
dividing it into two sides. If the neck is to be used for a pot
roast, it should be removed before the carcass is split. Place
the sides of venison inside down on a table and cut according
to the chart. Trim excess bone and gristle and further cut meat
into family size packages.
The Secret of Larding
a Roast
Venison is a "dry" meat, meaning it has
very little natural fat in it. Often it is "larded" before cooking,
by adding a bit of fat to make it more tender. Traditionally,
this is done with a larding needle, and can be a hard and messy
job.
Here is a nice, quick trick. Take a couple
thick, (3/16 in.), slices of salt pork, bacon, or other fat meat.
Cut into pieces a couple inches long and 3/4 inch wide at one
end, and pointed at the other end. Put the pieces on a heavy plate
and put the plate in the freezer until the bacon is hard frozen.
Make holes in the roast with a thin bladed knife. Aim the holes
toward the center of the roast. Shove a frozen piece of bacon
into each hole, just like a nail. Put in a nail of bacon every
square inch or two, and stuff them in good. If you are quick,
you can lard a roast like this in a couple minutes. When you are
done with the bacon, if you like garlic, shove thick slices into
some of the holes. When done, proceed with the marinating, or
the browning of the meat.
Fisher's Venison Jerky
"I should be selling this recipe," absolutely
the best jerky you can put your teeth on, just follow the directions
precisely. This recipe works well with any kind of red meat. The
best meat to use is venison, elk, or beef; the best cuts are flank,
brisket, or sirloin.
Ingredients:
- 6 lb. Venison or top sirloin
- 1 cup water
- 1 cup soy sauce
- 2 tablespoons vinegar
- 2 tablespoons brown sugar
- 3 tablespoons pure garlic juice
- ¼ teaspoon white pepper
- ¼ teaspoon cayenne pepper
- ¼ teaspoon paprika
- Salt to taste
- ¼ cup crushed black pepper
In a large plastic mixing bowl add all ingredients
except the venison and salt. Proportionately dissolve salt into
the brine until you have the desired amount of salt for your liking.
Place the brine into the refrigerator.
Cut the venison into strips of at least
1/8th inch thick, width and length does not matter. Make sure
you cut as much tendon and  fat
off as possible. Place the venison in the brine and let soak for
at least fifteen hours in the refrigerator. fat
off as possible. Place the venison in the brine and let soak for
at least fifteen hours in the refrigerator.
The most important part of making good
jerky is the drying process. Place the strips onto a wire rack
so that air can circulate around the meat. Sprinkle and pat down
with cracked black pepper. Let dry open air in a cool dry area
for at least six hours. When the meat is not moist to the touch
and has darkened considerably it is ready for the smoker.
Place the venison into a warm smoker. Make
sure the meat is spaced apart for good circulation. Smoke for
about six hours using at least two pans of mild smoke chips, alder,
apple, or cherry.
One of the most common causes of a ruined
batch of jerky is over-cooking. The meat should be a little tender
in the center.
Venison Summer Sausage
This is the best sausage recipe I have
come across. It takes four days to complete a batch but well worth
the wait. Sent to me from Bruce Powers who lives in Texarkana,
Arkansas.
Ingredients:
5 lb. hamburger or venison mixed with beef
tallow
6 tsp. curing salt (or pickling salt)
2 1/2 tsp. mustard seed
2 1/2 tsp. coarse ground pepper
2 1/2 tsp. garlic salt (3 cloves of garlic
chopped can also be used)
1 tsp. hickory smoke salt (Some liquid smoke
may be used)
First day: Mix in a large bowl, cover and
refrigerate.
Second day: Mix again and refrigerate.
Third day: Leave in refrigerator and do
not stir.
Fourth day: Form into 5 rolls. Place on
broiler pan and rack. Place on lower rack of oven. Bake 8 hours
at
160 - 170 degrees. Turn occasionally.
Refrigerate or keep in freezer.
Venison Pepperoni
This is a classic, I have never tried homemade
pepperoni before I received this recipe. Due to a dwindling supply
of venison I used beef but I bet it is as good or better with
venison. This recipe courtesy of Bea Mitts from Mulino, Oregon.
Ingredients:
PEPPERONI SAUSAGE MIXTURE:
- 5 lb. Venison or Beef
- 1 lb. Pork Fat
- 3 Tablespoons Pickling Salt
- Pepperoni Seasoning Mixture
PEPPERONI SEASONING MIXTURE:
- 3/4 cup Dry Powdered Milk (mix in enough
water to make paste)
- 2 Tablespoons Sugar
- 1 Tablespoons Cracked Black Pepper
- 1 Tablespoons (fine ground) Black Pepper
- 3 Tablespoons Chili Powder
- 1 Teaspoon Powdered Thyme
- 1 Teaspoon (rounded) Crushed Oregano
Leaf
- 1 Teaspoon Whole Anise Seeds
- 1 Teaspoon Ground Cumin
***Mix all seasonings together***
Grind venison or beef and pork fat together.
Add pickling salt, mix well. Then add the Pepperoni Seasoning
Mixture, kneading well.
Stuff Pepperoni Mixture into the casings
& refrigerate overnight.
Hang in smoker for approximately 6 hours...
It is vital that Pepperoni reach an Internal
152 degrees... If it hasn't reached this temperature, finish off
in conventional oven (at lowest possible setting) after smoking
long enough to get desired taste.
Makes about 6 lb s pepperoni sausage.
Slim Jims
Sorry gang, I totally ripped this off some other site. But it
has so many ingredients that I never heard of, it must be good.
let's just reserve this recipe for guys who have a couple of weeks
off work to pull the whole damn thing off. Let me know how
it turns out and if there are any changes we can make to call
this recipe our own.
Slim Jims (10
pound recipe)
2 level tsp.
Prague Powder #1
4 tbsp. paprika
6 tbsp. ground
mustard
1 tsp. ground
black pepper
1 tsp. ground
white pepper
1 tsp. ground
celery
1 tbsp. mace
1 tsp. granulated
garlic
3 1/2 ozs. kosher
salt
1 1/2 ozs. powdered
dextrose
6 ozs. Fermento
10 pounds lean
ground beef or venison
The last two ingredients are for fermentation and may be omitted
if you don't want the tang. After you stuff the beef sticks, we
recommends smoking at 90-110 F for 8 hours and letting it go at
this temperature for another 12 if you want the tang to fully
develop. Then you raise the smokehouse temperature until the meat
reaches 145º internally.
If you wish to modify your current recipe for the dehydrator,
or use this one in it (I highly recommend it, I've made it several
times), just follow the temperature guidelines - IOW, keep the
temperature under 110 for 8 to 20 hours, then crank it up to cook
the sausage at the very end. What you've probably been doing is
following the same procedure as for jerky, at 145 until dry, and
have been ending up with jerky in a casing. Beef sticks will not
be as dry as jerky, hence the lower temperature. I use the Prague
Powder #1 and make jerky at 120 and it is much more flavorful
than the stuff dried at 145 like most recipes call for. Under
140, the curing powder is absolutely necessary to prevent
the growth of botulism.
|